--- title: Connect MCP clients to Neon subtitle: Learn how to connect MCP clients such as Cursor, Claude Code, VS Code, ChatGPT, and other tools to your Neon Postgres database. enableTableOfContents: true updatedOn: '2026-02-04T14:57:09.215Z' --- This guide covers connecting MCP clients to the Neon MCP Server for natural language interaction with your Neon Postgres databases. The Neon MCP Server is intended for **development and testing only**. Always review LLM-requested actions before execution. See [MCP security guidance](/docs/ai/neon-mcp-server#mcp-security-guidance). ## Quick setup (Cursor, VS Code, Claude Code) The fastest way to get started: ```bash npx neonctl@latest init ``` This authenticates via OAuth, creates an API key, configures your editor, and installs [agent skills](https://github.com/neondatabase/agent-skills). Then restart and ask your AI assistant **"Get started with Neon"**. For other editors or manual configuration, see the sections below. ## Setup options - **Quick Setup:** Cursor, Claude Code, and VS Code support automatic setup with `npx neonctl@latest init` - **OAuth:** Connect to Neon's remote MCP server (no local installation needed) - **Local:** Run the MCP server locally with your API key (requires Node.js >= v18) For Local setup, you'll need a [Neon API key](/docs/manage/api-keys#creating-api-keys). ## Cursor Run the [init](/docs/reference/cli-init) command: ```bash npx neonctl@latest init ``` Authenticates via OAuth, creates an API key, installs the [Neon extension](/docs/local/vscode-extension) (which includes the MCP Server), and installs [agent skills](https://github.com/neondatabase/agent-skills). Then ask your AI assistant **"Get started with Neon"**. ```bash npx add-mcp https://mcp.neon.tech/mcp -a cursor ``` When the OAuth window opens, click **Authorize** to complete the connection. 1. Open Cursor. Create a `.cursor` directory in your project root if needed. 2. Create or open the `mcp.json` file in the `.cursor` directory. 3. Add the "Neon" server entry within the `mcpServers` object. Replace `` with your Neon API key: ```json { "mcpServers": { "neon": { "command": "npx", "args": ["-y", "@neondatabase/mcp-server-neon", "start", ""] } } } ``` 4. Save the configuration file. Cursor may detect the change or require a restart. For more, see [Get started with Cursor and Neon Postgres MCP Server](/guides/cursor-mcp-neon). ## Claude Code Run the [init](/docs/reference/cli-init) command: ```bash npx neonctl@latest init ``` Authenticates via OAuth, creates an API key, configures the MCP Server in `~/.claude.json`, and installs [agent skills](https://github.com/neondatabase/agent-skills). Then ask your AI assistant **"Get started with Neon"**. ```bash npx add-mcp https://mcp.neon.tech/mcp -a claude-code ``` When the OAuth window opens, click **Authorize** to complete the connection. ```bash claude mcp add neon -- npx -y @neondatabase/mcp-server-neon start "" ``` Replace `` with your [Neon API key](/docs/manage/api-keys). For more, see [Get started with Claude Code and Neon Postgres MCP Server](/guides/claude-code-mcp-neon). ## VS Code (with GitHub Copilot) To use MCP servers with VS Code, you need [GitHub Copilot](https://marketplace.visualstudio.com/items?itemName=GitHub.copilot) and [GitHub Copilot Chat](https://marketplace.visualstudio.com/items?itemName=GitHub.copilot-chat) extensions installed Run the [init](/docs/reference/cli-init) command: ```bash npx neonctl@latest init ``` Authenticates via OAuth, creates an API key, installs the [Neon extension](/docs/local/vscode-extension) (which includes the MCP Server), and installs [agent skills](https://github.com/neondatabase/agent-skills). Then ask your AI assistant **"Get started with Neon"**. ```bash npx add-mcp https://mcp.neon.tech/mcp -a vscode ``` When the OAuth window opens, click **Authorize** to complete the connection. Then open GitHub Copilot Chat and [switch to Agent mode](https://code.visualstudio.com/docs/copilot/chat/chat-agent-mode). Add the Neon MCP server to your [User Settings (JSON)](https://code.visualstudio.com/docs/copilot/chat/mcp-servers#_add-an-mcp-server-to-your-user-settings): ```json { "mcp": { "servers": { "neon": { "command": "npx", "args": ["-y", "@neondatabase/mcp-server-neon", "start", ""] } } } } ``` Replace `` with your [Neon API key](/docs/manage/api-keys). Then open GitHub Copilot Chat and [switch to Agent mode](https://code.visualstudio.com/docs/copilot/chat/chat-agent-mode). For a detailed guide including an Azure Function REST API example, see [Using Neon MCP Server with GitHub Copilot in VS Code](/guides/neon-mcp-server-github-copilot-vs-code). ## ChatGPT Connect ChatGPT to Neon using custom MCP connectors. Enable Developer mode, add the Neon connector, then enable it per chat. ![ChatGPT with Neon MCP Server](/docs/changelog/chatgpt_mcp.png) 1. **Add MCP server to ChatGPT** In your ChatGPT account settings, go to **Settings** → **Connectors** → **Advanced Settings** and enable **Developer mode**. Still on the Connectors tab, you can then **create** a Neon connection from the **Browse connectors** section. Use the following URL: ```bash https://mcp.neon.tech/mcp ``` Make sure you choose **OAuth** for authentication and check "I trust this application", then complete the authorization flow when prompted.
![ChatGPT connector configuration](/docs/ai/chatgpt_mcp_add_connector.png)
![ChatGPT with Neon MCP tools enabled](/docs/ai/chatgpt_mcp_tools.png)
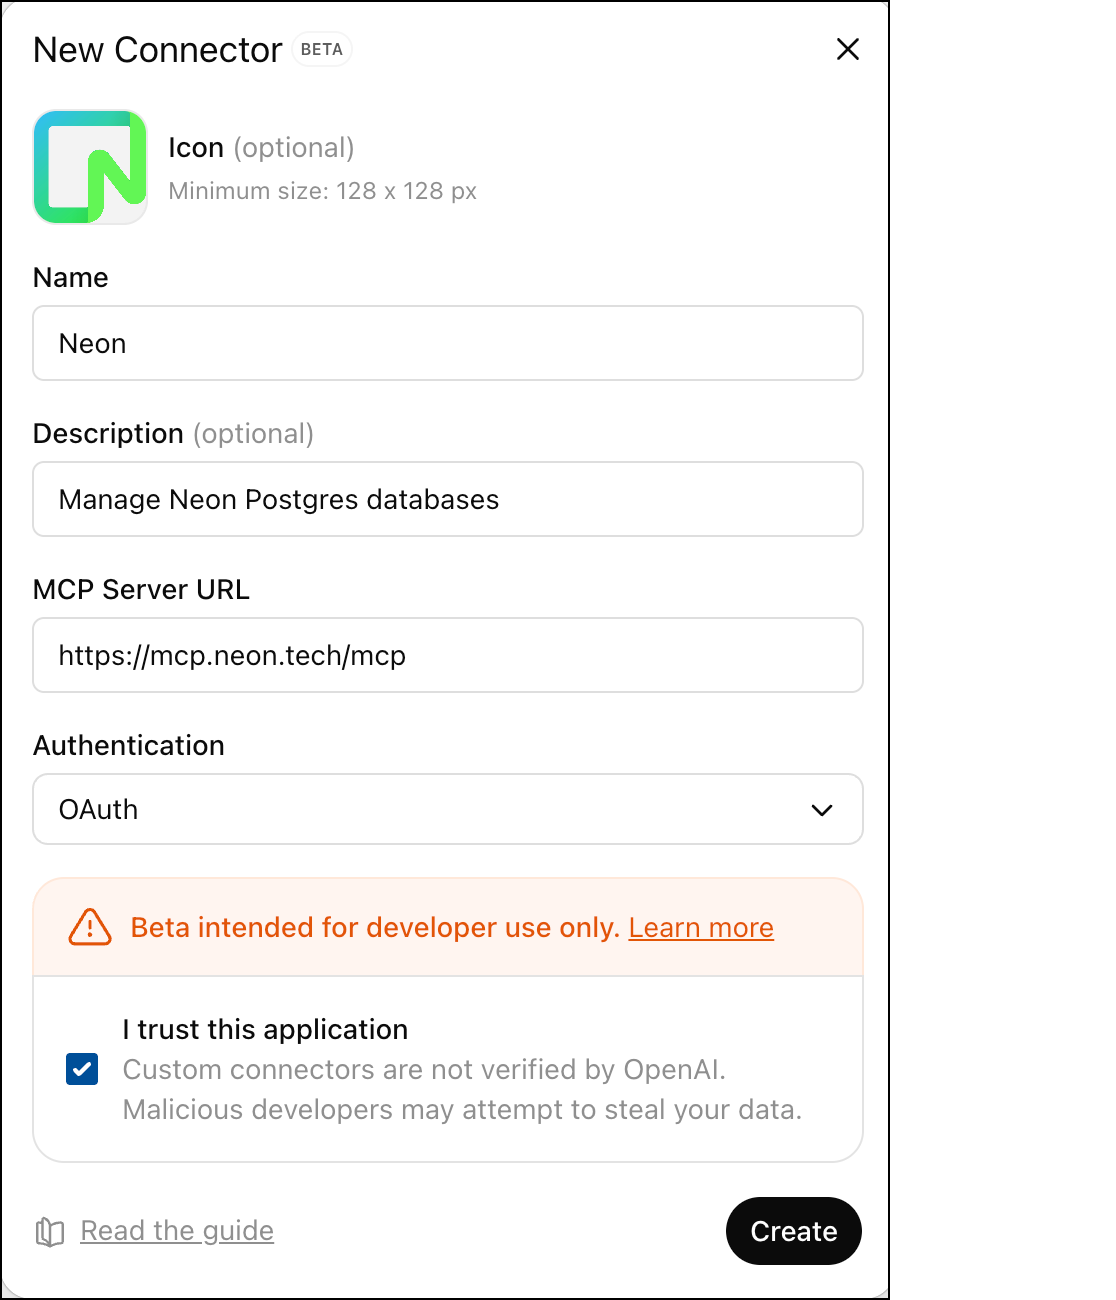
2. **Enable Neon per chat** In each chat where you want to use Neon, click the **+** button and enable Developer Mode for that chat. Under **Add sources**, you can then enable the Neon connector you just created. 
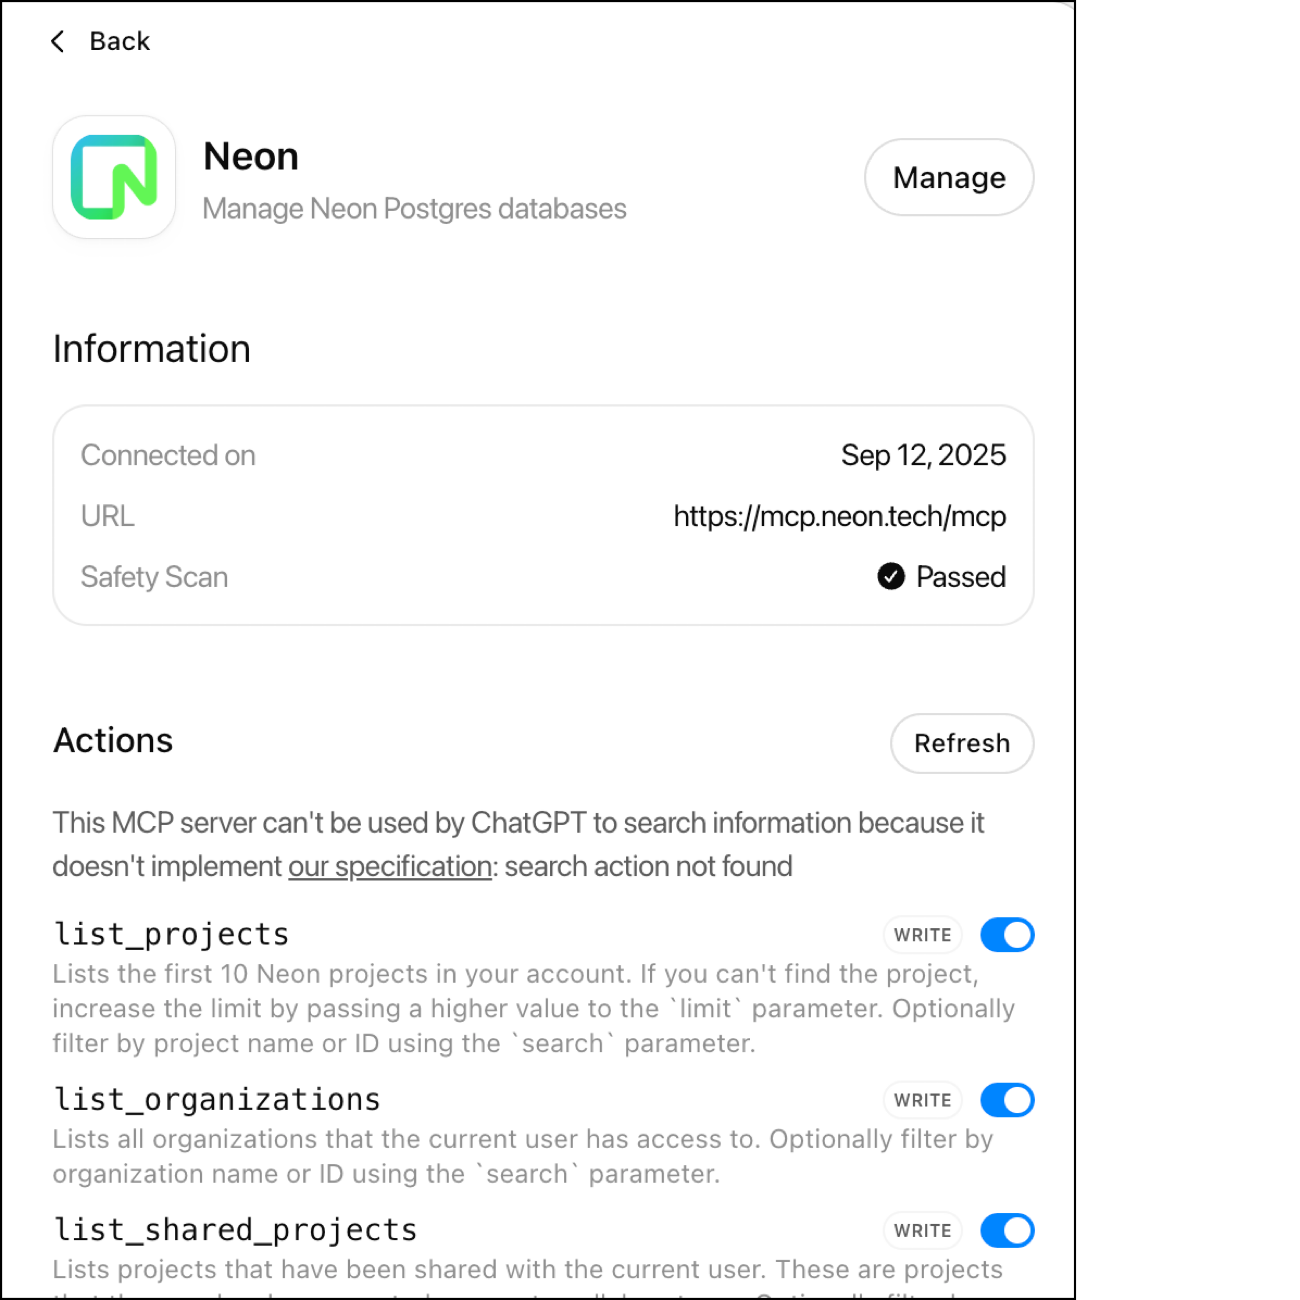
Once connected, you can use natural language to manage your Neon databases directly in ChatGPT. ## Claude Desktop ```bash npx add-mcp https://mcp.neon.tech/mcp -a claude-desktop ``` Restart Claude Desktop. When the OAuth window opens, click **Authorize** to complete the connection. ```bash npx @neondatabase/mcp-server-neon init ``` Replace `` with your [Neon API key](/docs/manage/api-keys), then restart Claude Desktop. For more, see [Get started with Neon MCP server with Claude Desktop](/guides/neon-mcp-server). ## Cline (VS Code Extension) 1. Open Cline in VS Code (Sidebar -> Cline icon). 2. Click **MCP Servers** Icon -> **Installed** -> **Configure MCP Servers** to open the configuration file. 3. Add the "Neon" server entry within the `mcpServers` object: ```json { "mcpServers": { "neon": { "command": "npx", "args": ["-y", "mcp-remote@latest", "https://mcp.neon.tech/mcp"] } } } ``` 4. Save the file. Cline should reload the configuration automatically. 5. When the OAuth window opens in your browser, review the requested permissions and click **Authorize** to complete the connection. 1. Open Cline in VS Code (Sidebar -> Cline icon). 2. Click **MCP Servers** Icon -> **Installed** -> **Configure MCP Servers** to open the configuration file. 3. Add the "Neon" server entry within the `mcpServers` object: ```json { "mcpServers": { "neon": { "command": "npx", "args": ["-y", "@neondatabase/mcp-server-neon", "start", ""] } } } ``` > Replace `` with your Neon API key. 4. Save the file. Cline should reload the configuration automatically. For more, see [Get started with Cline and Neon Postgres MCP Server](/guides/cline-mcp-neon). ## Windsurf (Codeium) 1. Open Windsurf and navigate to the Cascade assistant sidebar. 2. Click the hammer (MCP) icon, then **Configure** which opens up the "Manage MCPs" configuration file. 3. Click on "View raw config" to open the raw configuration file in Windsurf. 4. Add the "Neon" server entry within the `mcpServers` object: ```json { "mcpServers": { "neon": { "command": "npx", "args": ["-y", "mcp-remote@latest", "https://mcp.neon.tech/mcp"] } } } ``` 5. Save the file. 6. Click the **Refresh** button in the Cascade sidebar next to "available MCP servers". 7. When the OAuth window opens in your browser, review the requested permissions and click **Authorize** to complete the connection. 1. Open Windsurf and navigate to the Cascade assistant sidebar. 2. Click the hammer (MCP) icon, then **Configure** which opens up the "Manage MCPs" configuration file. 3. Click on "View raw config" to open the raw configuration file in Windsurf. 4. Add the "Neon" server entry within the `mcpServers` object: ```json { "mcpServers": { "neon": { "command": "npx", "args": ["-y", "@neondatabase/mcp-server-neon", "start", ""] } } } ``` > Replace `` with your Neon API key. 5. Save the file. 6. Click the **Refresh** button in the Cascade sidebar next to "available MCP servers". For more, see [Get started with Windsurf and Neon Postgres MCP Server](/guides/windsurf-mcp-neon). ## Zed MCP support in Zed is currently in **preview**. Ensure you're using the Preview version of Zed to add MCP servers (called **Context Servers** in Zed). Download the preview version from [zed.dev/releases/preview](https://zed.dev/releases/preview). ```bash npx add-mcp https://mcp.neon.tech/mcp -a zed ``` When the OAuth window opens, click **Authorize** to complete the connection. 1. Open the Zed Preview application. 2. Click the Assistant (✨) icon, then **Settings** > **Context Servers** > **+ Add Context Server**. 3. Enter **neon** as the name and this command: ```bash npx -y @neondatabase/mcp-server-neon start ``` 4. Replace `` with your [Neon API key](/docs/manage/api-keys) and click **Add Server**. For more details, including workflow examples and troubleshooting, see [Get started with Zed and Neon Postgres MCP Server](/guides/zed-mcp-neon). ## Other MCP clients **Quick setup with add-mcp:** ```bash npx add-mcp https://mcp.neon.tech/mcp ``` This tool auto-detects supported clients and configures them. Use `-a ` to target a specific agent (e.g., `-a cursor`). For manual configuration, add one of these to your client's `mcpServers` section: **OAuth (remote server):** ```json "neon": { "command": "npx", "args": ["-y", "mcp-remote@latest", "https://mcp.neon.tech/mcp"] } ``` **Local setup:** ```json "neon": { "command": "npx", "args": ["-y", "@neondatabase/mcp-server-neon", "start", ""] } ``` For Windows-specific configurations, see [Local MCP Server](/docs/ai/neon-mcp-server#other-setup-options). ## Troubleshooting ### Configuration Issues If your client does not use `JSON` for configuration of MCP servers (such as older versions of Cursor), you can use the following command when prompted: ```bash # For OAuth (remote server) npx -y mcp-remote https://mcp.neon.tech/mcp # For Local setup npx -y @neondatabase/mcp-server-neon start ``` For clients that don't support Streamable HTTP, you can use the deprecated SSE endpoint: `https://mcp.neon.tech/sse`. SSE is not supported with API key authentication. ### OAuth Authentication Errors When using the remote MCP server with OAuth authentication, you might encounter the following error: ``` {"code":"invalid_request","error":"invalid redirect uri"} ``` This typically occurs when there are issues with cached OAuth credentials. To resolve this: 1. Remove the MCP authentication cache directory: ```bash rm -rf ~/.mcp-auth ``` 2. Restart your MCP client application 3. The OAuth flow will start fresh, allowing you to properly authenticate This error is most common when using OAuth authentication and can occur after OAuth configuration changes or when cached credentials become invalid. ## Next steps Once connected, explore the [available MCP tools](/docs/ai/neon-mcp-server#supported-actions-tools) to see what you can do with natural language. ## Resources - [MCP Protocol](https://modelcontextprotocol.org) - [Neon API Reference](https://api-docs.neon.tech/reference/getting-started-with-neon-api) - [Neon API Keys](/docs/manage/api-keys#creating-api-keys) - [Neon MCP server GitHub](https://github.com/neondatabase/mcp-server-neon) - [VS Code MCP Server Documentation](https://code.visualstudio.com/docs/copilot/chat/mcp-servers)